Using AirServer on the PC with an iPad
Recently, our district stumbled upon a little software package called AirServer. We hadn't looked at it much in the past because it was originally available for only Mac computers. Now that it includes support for Windows machines, we can fully implement it across our district.
Our teachers have reported a much higher level of success and satisfaction from this versus using an Apple TV (see the company's comparison here). Several of the main factors are:
Our teachers have reported a much higher level of success and satisfaction from this versus using an Apple TV (see the company's comparison here). Several of the main factors are:
- A teacher doesn't have to switch inputs on the projector to see what is on their iOS device on the big screen, it runs on the computer and the mirrored image comes up automatically. Included in that idea is that there is no need for extra cables, it runs through the same connection as the computer.
- The size of the mirrored image can be tailored to fit the personal needs/wants of a teacher or the occasion. Go full screen when you need to, or resize the window to have it sit side by side with another image already on the computer.
- More than one device can connect and mirror at one time. We can have students compare and contrast their own work or examples they've found in real time. *Note: It seems to work well with up to 4 devices connected. More than that seems to bog the system and cause some buggy behavior.
- Cost always makes a difference in education. An Apple TV is $99 per device. AirServer is $14.99 for an individual license, but when bought in bulk, it can be as low as $3.99.
Some other nice features are the ability to password protect the connection and a huge increase in screen resolution.
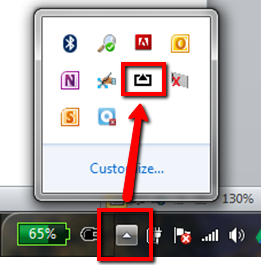
- Log-in to your computer and verify
that AirServer is running. Check in your system tray (right hand section of the
task bar) for the AirServer icon. It will display here if it is running.
- From the iOS device settings, check to make sure that the correct wireless network is selected and joined. The device must be on the same network as the computer running AirServer.

- Swipe up from the bottom of the screen, with one finger, to display the Control Panel and select “AirPlay.” Note: This option will only display when connected to the correct network; it will not show when it does not detect an AirPlay destination.

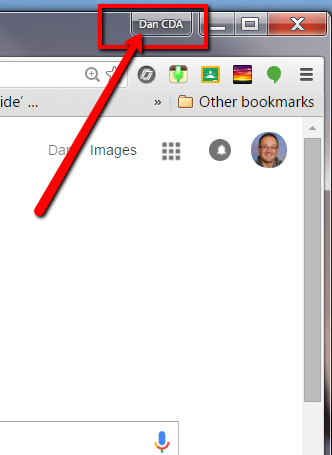
- Select the computer you wish to
connect to and input the password, if prompted.

- Slide the mirroring switch so that it
displays the green indicator. At this point, the iOS device should show up on
the screen of your projecting computer. You can use the "View" options to adjust your display.

*Note:
The device will maintain connection with the computer until the destination is
reset to the device. Turning off the mirroring option only disconnects the
visual connection, not the actual connection with the computer. If you do not
select the device as the default connection, undesired performance of the
device (volume loss, image loss, etc.) may occur.


Comments
Post a Comment